
Create a result set
In order to generate a result set report, you must first create a result set and calculate it.
To create a new result set:
- In the Result Sets explorer, select the folder where you want to create the result set. Then click the
Add
 button on the ribbon and select
Result Set. Note you can add folders (and sub-folders) to organise result sets by selecting
Folder in the drop-down menu.
button on the ribbon and select
Result Set. Note you can add folders (and sub-folders) to organise result sets by selecting
Folder in the drop-down menu. - The New Result Set dialog will open.
- Select the hierarchy to be used, and the projects that you want to be included using the Calculation Hierarchy display:
- One run ('Run 1') is automatically added. If you require additional runs, use the Add Run button in the Result Sets tab on the ribbon.
- The settings described in the table below apply to every run in the result set:
- Result Set settings are changed
- Projects are added or removed from the result set selection (i.e. if you want to add new projects to the result set, it is necessary to re=calculate the entire result set).
- Projects or folders that are part of the result set have been renamed, deleted or moved in the hierarchy.
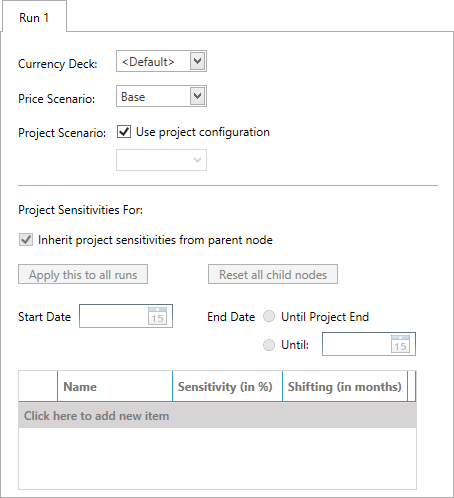
- Each run has its own settings as described in the following table.
- When the settings are completed, click the Calculate
 button on the ribbon. Each
Run calculation will be performed as a job on the IPS Server and you can use the Task Notification area at the bottom right of the screen to follow the progress of the calculations. When each run calculation is complete an alert balloon will appear as shown.
button on the ribbon. Each
Run calculation will be performed as a job on the IPS Server and you can use the Task Notification area at the bottom right of the screen to follow the progress of the calculations. When each run calculation is complete an alert balloon will appear as shown. - When the calculation job is complete, the run outputs can be accessed by opening the result set in the Result Sets explorer.


Enter a name and click OK. The new result set will then appear in the Result Sets explorer and will automatically open in a new tab.

For version 16.4 Update 3 and later: the Calculation Hierarchy has a context menu (accessed using right-click on a node folder) which allows you to Expand or Collapse the view of the contents of the node.

| Setting | Description |
|---|---|
| Customize Partners | Checking this box enables you to specify which partners can be included in the result set report by clicking Select.... If you do not check the box, only the main partner will be available. |
| Ringfence | Applies ringfencing to the calculation. Note that the selected projects must be already ringfenced for this setting to take effect (see Apply ringfencing to a project). |
| Store all variables for auditing purposes | Stores all of the variables calculated, in the state they were in at the time of calculation. |
| Switch to recalculate mode |
Checking this box enables you to re-calculate a subset of projects within a previously-calculated result set. This is especially useful if you have a large result set where only a handful of projects have changed since it was last calculated. Note that this option is disabled when: In recalculate mode only the projects stored in the result set when it was last calculated with the recalculate mode option unchecked will be displayed. All folders and projects are displayed grayed out until they are selected. The selected projects will be recalculated if you click the Calculate button in the ribbon. |
| Setting | Description |
|---|---|
| Currency Deck | Specifies the currency deck that will be used for the result set run. By default this is the currency that is active in the hierarchy; use the drop-down menu to select a different currency deck. |
| Price Scenario | Specified the price scenario that will be used for the result set run. Use the drop-down menu to select another price scenario from the price deck. To use a different price deck altogether, you will need to replace the active price of the hierarchy. For instructions on how to do this, see Replace a price deck. |
| Project Scenario | Specifies the scenarios that will be used for each project. Use project configuration will use the scenarios and weightings that have been specified in the project (see Scenario Consolidation Settings). Select scenario will allow you to use the drop-down menu to choose a scenario that will then be applied to all the projects in the result set run. |
| Project Sensitivities | Allows you to apply sensitivities to variables that can then be added to result set runs by clicking Apply this to all runs. Note that to add sensitivities the parent node must be selected in the Calculation Hierarchy. Clicking Reset all child nodes will remove the sensitivities that have been specified for all projects in the run. |
| Start Date | Specifies the start date for the projects in the result set run. |
| End Date | Specifies the end date for the projects in the result set run. Selecting Until Project End will use the end date of each individual project. |


Note that the Run icon changes from ![]() for a new and un-calculated Run to
for a new and un-calculated Run to ![]() for a calculated run.
for a calculated run.
Now that you have calculated a result set, you can open one of the its runs and generate a result set report (see Generate a result set report).